Freycob

"Good Food Made Easy"

  • Home
  • Recipes
    • Bread and Pastry
    • Cakes & Muffins
    • Chutneys, Jams, Relishes and Sauces
    • Desserts & Puddings
    • Drinks
    • Fish
    • Main Meals
    • Soups, Starters and Snacks
    • Sweets and Teatime Treats
    • Veg on the side
  • Reviews
    • Book Reviews
    • Equipment
    • Events
    • Food & Drink
    • Products
    • Restaurants
  • Competitions & Giveaways
  • Who is Freycob?
  • Contact Me
  • Privacy & Cookies Policy
You are here: Home / Chicken / Roast chicken curry with Clearspring Organic Rice Trio

Roast chicken curry with Clearspring Organic Rice Trio

17th August 2014 by Freycob

Having spatchcocked the chicken, placed it on a trivet of sweet potatoes and onions and originally intending to make a roast dinner out of it, I changed my mind when the chicken was cooked and had come out of the oven, so I made a quick & easy chicken curry out of it instead.  Here’s how:


For the roast chicken:
1 large chicken
2 sweet potatoes, quartered
2 medium onions, quartered
200ml cold water
For the curry:
1 Knorr Curry Flavour pot
30ml/2tbs Mango chutney (or to taste)
To serve:
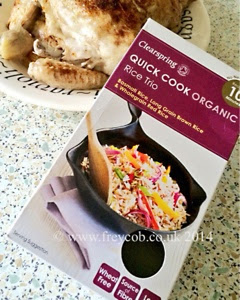
80g Clearspring Quick Cook Organic Rice Trio (per person)
Fresh coriander, chopped

1. Heat the oven to 180C.
2. Turn the chicken onto it’s breast and, using a pair of robust scissors, cut down each side of the spine to remove it.
3. Turn the chicken over and open out the legs and the wings.
4. Press down on the ribcage until it cracks and the chicken flattens out.
5. Peel and quarter the sweet potatoes and onions.
6. Place into the centre of a large roasting dish and place the chicken on top, breast & skin side up.
7. Pour in 200ml cold water & cover tightly with foil.
8. Roast for 1 1/2-2 hours until well cooked.
9. Remove the chicken from the pan, cover and allow to rest.
10. Pour the meat juices, sweet potato and onions into a saucepan and add the Knorr Curry Flavour Pot.
11. Bring to the boil and then add the mango chutney, adjusting the quantity to taste.
12. Blitz the curry sauce with a stick blender until smooth.
13. Bring a large pan of water to the boil, then add the Clearspring rice trio.
14. Gently boil the rice for 10 minutes, or until cooked and then drain.
15. Meanwhile, flake the chicken into pieces.
16. Serve the rice, making a hollow in the centre.
17. Add the flaked chicken to the centre of the rice and spoon some curry sauce over the top.
18. Garnish with chopped coriander and serve with naan bread.


The Clearspring Rice Trio was sent to me free of charge to sample.  All other ingredients were purchased by me personally and were not sponsored. I was under no obligation to publish content using the box of rice sent to me. We found the rice trio combination to be tasty, as well as enjoying the different textures of the Basmati, long grain brown and the Wholegrain rice.

Share this:

  • Click to share on Pinterest (Opens in new window)
  • Click to share on Twitter (Opens in new window)
  • Click to share on Tumblr (Opens in new window)
  • Click to share on Facebook (Opens in new window)
  • Click to share on LinkedIn (Opens in new window)

Related

Filed Under: Chicken, Clear Spring, Curry, Flavour Pots, Knorr, Recipe, Rice

« Restaurant Review – Byron Hamburgers – Greenwich Promenade
Plum and Almond cake with Bottlegreen Ginger and Lemongrass Syrup »

Find me here too

Facebooktwitterpinterestinstagramflickrmail

Search Freycob.co.uk

Foodies100 Index of UK Food Blogs
Foodies100
blogl
World Baking Day Ambassador 2013
alldishes.co.uk

Tag Cloud

baking BBC Good Food Show beef Birthday Blogger Blogger Challenge Blogger Event butter Buttercream cake cakes carrot Central Co-Op Central England Co-Operative cheese Chicken chocolate cinnamon Competition Cream Dinner Family meal flour fondant Food Food Blogger Food Review garlic ginger Giveaway Kenwood lemon Meal Meat onion potatoes PR Rapeseed Oil Recipe Review sugar Uncategorized vanilla vegetables Wine

Previous posts

  • June 2020 (1)
  • February 2020 (1)
  • October 2018 (1)
  • April 2017 (2)
  • November 2016 (9)
  • October 2016 (3)
  • September 2016 (2)
  • July 2016 (1)
  • June 2016 (7)
  • May 2016 (2)
  • April 2016 (2)
  • March 2016 (2)
  • February 2016 (3)
  • January 2016 (3)
  • December 2015 (2)
  • November 2015 (3)
  • September 2015 (1)
  • August 2015 (1)
  • July 2015 (5)
  • June 2015 (4)
  • May 2015 (4)
  • March 2015 (4)
  • February 2015 (7)
  • January 2015 (2)
  • December 2014 (6)
  • November 2014 (11)
  • October 2014 (10)
  • September 2014 (6)
  • August 2014 (6)
  • July 2014 (4)
  • June 2014 (7)
  • May 2014 (4)
  • April 2014 (5)
  • March 2014 (3)
  • February 2014 (3)
  • January 2014 (6)
  • December 2013 (8)
  • November 2013 (5)
  • October 2013 (10)
  • September 2013 (5)
  • July 2013 (1)
  • June 2013 (3)
  • May 2013 (6)
  • April 2013 (2)
  • March 2013 (2)
  • February 2013 (1)
  • January 2013 (1)
  • November 2012 (1)
  • October 2012 (3)
  • September 2012 (1)
  • August 2012 (4)
  • July 2012 (10)
  • June 2012 (9)
  • May 2012 (4)
  • April 2012 (2)
  • March 2012 (2)
  • February 2012 (2)
  • December 2011 (2)
  • November 2011 (1)
  • October 2011 (4)
  • June 2011 (3)
  • May 2011 (1)

Follow Me here too

Facebooktwitterpinterestinstagramflickrmail

Subscribe to Blog via Email

Enter your email address to subscribe to my blog and receive notifications of my new posts by email.

Categories

Copyright © 2025 · Foodie Pro Theme by Shay Bocks · Built on the Genesis Framework · Powered by WordPress

This website uses cookies to improve your experience. We'll assume you're ok with this, but you can opt-out if you wish.Accept Read More
Privacy & Cookies Policy
Necessary Always Enabled